Wedding Trends 2013: Ombre Cake

ombre wedding cake

Well hello Loves!! How is everyone enjoying their summer? I hope you didnt think I forgot about L+K… and most importantly, about the third wedding trend of 2013. Sorry for the Hiatus, I switched jobs and had to take care of some Childcare situations for the bebeb.

Today’s trend is mouth watering goodness…yet too pretty to think about eating. If you’ve been looking at the same stuff I have, there is no mistake that Ombre cakes are a big hit this year. Can someone say “trend alert” ! Bakers are getting very creative and their creations are absolutely beautiful. They range from elaborate ombre layering, to minimalistic or geometric details. Either way, I’m a big fan. You can see my Ombre Roundup above….these are just some of my faves.

And of course, I always love to offer a modified version. If you are not into the ombre look on the outside of your cake, you can always go ombre “inside.” Guests will have such a pretty looking suprise when your servers place that cake plate in front of them and they see those wonderful hues of cake.

Have any of you had an ombre cake for your wedding or party? please share!! I would love to see it!

Cheers

xoxo

Annaliese

ombre insides

Wedding Trends 2013: Mint

Minty Fresh Wedding
 
Spring is in full bloom and along with it comes Wedding Season!!…Which is why this months theme is Wedding Trends! I am in love with all the fresh Minty inspiration popping up in the wedding scenes. So cool and classy, you can showcase the minty hues in modern, vintage, or classic styled celebrations. It can be your main color throb or a fresh accent. However you choose to use it, this color is definitely here to stay all year long!
Need a little inspiration? Check out a few different ways you can whip up a little mint into your wedding.
mint inspiration
 
Stay tuned next week for another Wedding Trend here on the blog!
xoxo
Annaliese
{Boards made by me on: Polyvore : Pictures from Pintrest}

“Oh Baby!” Shower


{all images by Vivian Sachs Photography}


Last weekend was our Baby Shower for the “Little Man.” I was so excited to finally celebrate his arrival with all our friends and family. To top it off, our friend and “go to” photographer, Vivian Sachs was there to capture everything.

Hubby and I started planning for the shower months in advance due to the fact that we had two big families and space would be an issue. I immediately went into design mode and for the past three months, it has been my little project on the side that gets my creative juices flowing. With Pintrest and numerous blogs for inspiration, and my handy/crafty familia at my side…I was really excited to put everything together.

Instead of going for a theme, I picked colors as my base and made a list of all the little details I wanted to add. I then started to think of how to make it all fit together.

Our Venue: Historic Adobe Building, Mountain View, CA

Base Colors: Navy Blue, White, Lime Green, Orange

Motif: Stripes, Chevron, Pops of Color, Playful


The sweets table was probably my favorite to put together since I just love eating sweets and treats right now =) On the table:

  • Chevron Cake made by my cousin Celine
  • Coordinating cupcakes also made by my cousin
  • SF Giants sugar cookies from Sweet Keiras to include mine and my husband’s vast enthusiasm for our bay area sports teams
  • Navy Blue M&Ms
  • Popcorn Cones filled with White Cheddar or Kettle Corn flavored popcorn. I made these using a simple template found here and bought some mini clothes pins from Michael’s and used a scallop punch out to cut out the tags. Double sided tape was the best at sealing the cones
  • Orange and Green swirl mini Lollipops with our custom Thank you sticker
  • Chevron treat bags from Shopsweetlulu.com which also had our custom Thank you sticker we ordered from Etsy’s The Preppy Lady Bug
  • specialty napkins we found at target and were on sale!

The streamer background was made by my family and myself. We were cutting and frilling crepe paper while watching all the torturous SF Giants playoff games. Since we had the shower at a historical building, we couldnt nail or hang anything from the walls or beams, so my dad and I constructed a simple pipe and drape using PVC piping. We actually made two backdrops. One for the sweets table and one for the Self Photo Booth. Want to make these cute frilly streamers? Here is the How to that we used!

The banners were made by mom using cream burlap and simple navy card stock. She drew and cut out the letters herself.


I really wanted a lot of stripes at the event and I tried to incorporate that into mini details like the straws and napkins. I was so excited to find this green and white strip overlay at a linen rental company so I paired it with a standard navy blue tablecloth for half of the guest tables.

I am currently obsessed with Geronimo balloons or anything that uses weather balloons…Just take a look at my pintrest page…I mean who isnt? So of course I used them as inspiration for our shower decor. I decided to do simple balloons for some of the centerpieces using a white weather balloon, Blue hanging tissue paper balls that I found at a typical party store and used more of the frilly streamers that my family had cut out for me. I just used glue dots (Zots) to assemble everything onto the balloon string and it worked like a charm

The second half of tables, we decided to do simple spray painted bottles with a single bloom. My Mom, Dad and Sister collected all the bottles I needed and my Dad spray painted them. The day before the shower, hubby and I picked up some coordinating blooms from the local farmers market and that was that.


My mom and I thought about doing a onesies table but not just with messy puff paints, I really wanted to try and make this activity practical and fun for the guests to make….mostly I really wanted the onesies to come out “wearable” for the baby boy. The result?? Remnant fabrics! we collected a bunch of remnant fabrics, threw in some fabric paints (the kids love those) and lots of scissors and a couple tubes of fabric glue and asked people to go to town. Above you can see only some of the numerous creative creations by our guests….Baby boy will definitely be wearing these. By the end of the event, the clothes lines were full of cute onesies.


Out of everything that resulted from the shower, the design, the presents, the food…everything, the guest book tree was my absolute favorite thing about the whole event. I ordered a digital graphic of a tree guest book (usually for weddings) from etsy seller little forests. and I printed out a 16×20 print at my local printers. We displayed it in a wood frame and had different shades of green ink pads next to it along with some sharpie markers. My sister used a little chalkboard to show the “How To” and everyone that came, made a little leaf print on the tree using their finger and wrote their name next to it. All the kids (baby’s cousins) did this as well and by the end of the day, the tree was covered in leaves. This piece of art will hang over the baby’s crib in his room. I absolutely love it.


Where there is a baby shower, there are games…more specifically, where there is a baby shower that my family is throwing, there will be games. My family loves games to a point where if there are no games at our party, some one will think something is wrong or we are not feeling well. With that said, we chose a few games play and with the weather being gorgeous outside, it made for a great setting. My sister thought of the game “Bobbing for nipples” for a set of guys to play which in itself was hilarious and gross. We also had teams of two play “feed the baby” blindfolded and for the kids, we played “Pin the baby on the Mommy”. It was so great to have a lot of kids there. They had a place to run around and play and I couldn’t help but think that soon enough, our little guy will be running around there with them.


Thanks to everyone that helped Daniel and I in throwing this baby shower…and most importantly to all our true friends and family who celebrated with us. It means the world to us that our baby boy is surrounded by such wonderful people

xoxo

Anna & Daniel


*All Image Credits to: Vivian Sachs Photography*

Tuesday Soirees: Ombre Cake

{image found on Colin Cowie Weddings actual design by Maggie Austin Cake}
 

I am absolutely in love with this cake! I cant stop looking at it! the beautiful ruffles, the pink ombre….detailed flowers atop….Drooling. Right. Now!

I’m begging someone to please use this as inspiration for their wedding cake!!

xoxo
Annaliese

Flower Feature: Anemones

Today I want to put the spotlight on special little flower that packs a big punch when included in floral decor. Anemones…
These flowers are so mysterious and dramatic. Delicate & dark at the same time.
I especially love how they add classiness to a very sophisticated black and white wedding palette.

Dont you just love the monochromatic look of an “all anemone” bouquet?
These lovelies are popular for adorning cakes for yet again, a simplistic and sophisticated look.

I love the slight tinge of powder pink in these pictured below and how they can also dress up and compliment a vintage rustic look.

Black and white too plain for you? Still like the structure of these beauties? Dont you worry, they come in many colors…including…
RED!!
{click on photos for link and credit}
xoxo
Anna

Cake Love


{style me pretty & Scobey Photography}


{Style Me Pretty & Fuse Photographic}

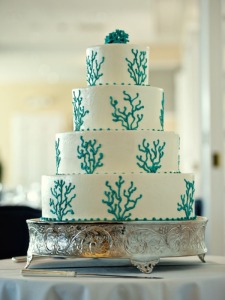
Today I was dying to feature these two cakes that I stumbled upon in the past couple days….All this loveliness is hard to handle so I had to share it somehow!!

Both were spotted on “Style Me Pretty” which is no surprise. These two cakes definitely stole my attention. They are so simple, and original and who doesn’t like teal coral accents and letterpress style typography?!

I hope you love these lovelies as much as i did!

Inspiration of the Day: Pheasant Feathers

Such gorgeous detail was found in this Inspiration Photo shoot. It was featured on Style Me Pretty. Modeled after Ralph Lauren, I seriously cant get enough of these photos. Everything is so chic and original.
The feathers…are not your typical peacock feathers that are becoming popular wedding themes…but these are Pheasant feathers. And when mixed with the natural tan, wood and black tones….you get a very elegantly inspired affair with a ton of old world charm.

Lovely table-scapes
Love the dessert table and the very simple but dramatic cake.

Do you see the hint of riding boots peering from her dress?

Smitten for all this detail…the cloth and burlap runners, crisp white flowers, bunches of grain stalk, antique style candle holders, rustic table, black chairs, feathers….*sigh*
You can check out the rest of the photo shoot Here
{Lens: Studio 28}

Cute Find: Ticings Cake decor


Planning for an upcoming party soon and stumbled upon this company called “ticings” which makes “edible icing appliqués” to spruce up your cakes or cupcakes. Their designs would definitely bring a fun flare to diy cupcakes for a wedding or any party!!

What are “Ticings”?
“ticings™ are thin sheets of edible icing printed with contemporary designs using food-grade inks.made in the u.s.a., gluten-free, FDA approved and kosher certified, ticings are best applied to fresh buttercreamfrosting. just peel and pressto give your cakes and frosteddesserts modern decorations in minutes!”

They have a few different types of designs for kids, parties, weddings…but you can design your own to match anything. I am thinking of using this for the cupcakes we are planning on making for my Grandma’s surprise shindig (a big reason I’ve been away from the blog world for a while when you combine that with weddings and consults).

Anyways, here are some really cute design and ideas from their page as well as a simple how to.


it’s as simple as one, two, three.”
1. frost. prepare your baked surface with a soft frosting (buttercream works best, but any soft frosting will work). make sure the finished surface is smooth and flat.
2. peel. with dry hands, gently peel ticings from the backing sheet and center on top of the frosted surface.
3. press. gently pat into place, smoothing the edges to remove any air bubbles or unevenness from the frosting underneath. add sprinkles, sanding sugar or frosting decorations around the edges to finish, or use alone for a quick and elegant decoration.

If you guys end up using them, share some pictures with me and I’ll do the same =)

Happy Weekend everyone!!